Ah...It seems that taking care of your animals is not the end all be all of alpaca farming. While I find it the most relaxing I do also enjoy the fiber aspect of my job. Creating items from alpaca fiber is a lot of fun. However, I want to sell them too. There are a lot of ways that you can market your fiber. The most common is via the internet. Yet you can market your fiber at craft and fiber shows, offer classes, give demonstrations, join spinning groups and of course there is the Etsy store. Etsy is the mecca for handcraft items. Posting your items on Etsy is done in 1/2 hour. At least not the first time. I learned the hard way by setting up a store and then sort of winging the photographs. The pictures of your items are the single most important aspect of your store.
I am not a photographer. In fact I don't really have the patience for photography. I just want to put my item on a table and take a photo and be done with it. Unfortunately that is not how it works. So I decided after my initial attempt at my Etsy store I would pull everything off my site and restart after I did some thorough research. I started with the Storque blog on Etsy. I found a really great article by a photographer. She demonstrated how to build a light box-a suggestion that my professional photographer husband had recommended a long time ago to me. This box basically helps control the light so you can take better photos.
The link to her blog is http://www.etsy.com/storque/seller-handbook/etsys-guide-to-photography-10979/ Copy and paste this then scroll down to the bottom of the page for the DIY light box. There is a lot of information there for the camera shy.
This is a photo of my box. In spite of not looking so great it has turned out to be a lifesaver. I don't have a professional camera and frankly don't know how to use half of the settings on my Olympus Stylus Tough. (It can be used underwater..ooo that is a thought!)

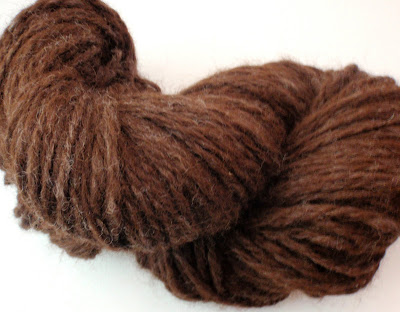
This is a photo of a skein of yarn taken in the light box.

And a skein outside of the light box.

How I did it.
I placed my light box on a stand. I turned a magnifying glass with a built in light on and placed it at the side of the
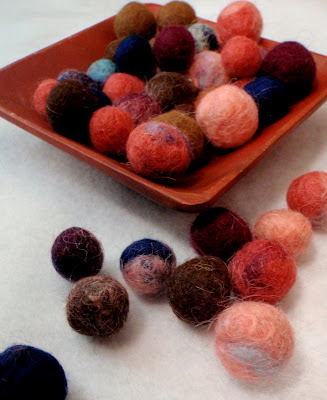
box. I placed white stock board paper in the bottom and at the back of the box. I turned off the flash and put a shadow adjustment on the camera. Then I began to think I how could enhance the photos by staging a bit. The draw back with the box is that you are limited on the size of items that fit into it. A skein of yarn works great but a gum ball machine is too tall. I searched around my house for some small items as the wood bowl seen in the photo at the top. It took me about four hours to complete this session and I took photos of about 10 items. I was getting tired and annoyed toward the end. I suggest that you set up your props and products the day before so you will be ready to focus only on the photographs. It is too distracting running around all over the house looking for stuff.
And speaking of stuff -try to be creative in your staging. Use color to enhance your product by placing it on a cloth or stand that makes your work pop out. I am thinking of putting my 2 oz rovings in a trifle bowl or perhaps on a tray that has a complimentary color to the roving. For example if you create felted flower pins you could place your pins with a small hand shovel or clay pot in the background maybe some soil scattered in the foreground. You get the idea...
Make it fun and creative so that it won't seem like work, but part of your overall project. The photos you can keep as records of your work or to submit to juried shows. Think of the broad picture (no pun intended).
Once your photos are taken you can upload them to a site <"http://www.picnik.com/"> to crop or fix the color saturation, etc. This site was suggested to me by Twirly Curly Bird. See her Etsy shop at http://www.etsy.com/shop/TwirlyCurlyBird I highly recommend that you use this site or another similar one to clean up your photos before publishing them. Although I am still working on a few details such as the larger items that won't fit in my 12 x 12 x 12 light box. One step at a time. At least I have a store back up and running. And it has some pretty neat photos!
Sorry all. I just could not upload the sites so you could just click on them. Drove me crazy!! Tamara
ReplyDeleteThanks for all the information. I've been toying with different ways to improve my photos too. I've started to use a white board and I have seen a major improvement. Thanks for the links.
ReplyDelete